Maya viewport shader, made with CgFX
I started this project to learn more about video game graphics and how it fits within the art pipeline. I thought the best way to discover these technical art intricacies would be to start in a 3D modeling program in which artists spend a lot of time in. I wrote an Autodesk Maya viewport shader from scratch. This shader would have to be capable of providing a good variety of choices for the artist. It would also have to be of at least PS3/360 generation. Its user interface would be kept as simple as possible, but not watered down.
A Big F- Shader
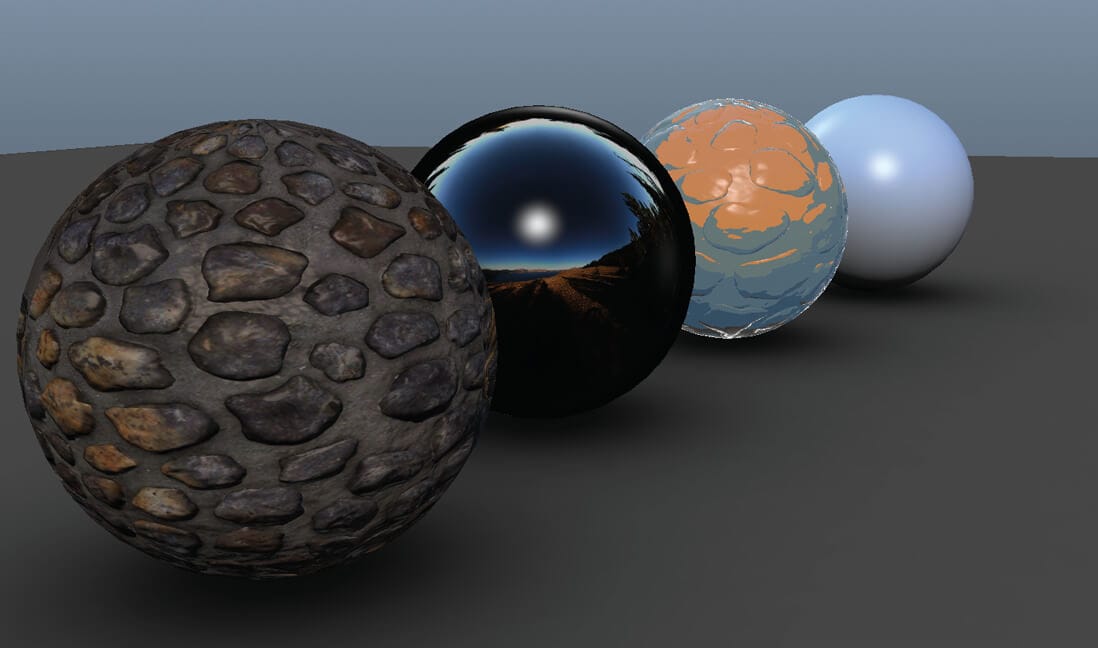
This shader, lovingly named "BFS 2500," clocks in with 68 distinct shading attributes. I wanted to retain current-gen standards and 68 of them is just the tip of the iceberg. Starting with foundational lighting, this shader provides two lighting models called Blinn and Phong. They’re named after the people who created them, Jim Blinn and Bui Tuong Phong. These aren’t the only models around. There’s also Ward anisotropy, Cook-Torrance, and Oren-Nayar to name a few. We don’t see these often in PS3 or Xbox 360 games because of their high mathematical overhead. In this post’s image, all of the materials use Phong lighting and are hooked up to one directional light and two point lights. They’re all also in linear color space, a gamma-correct format meant to portray real-life lighting more accurately. Lighting is less likely to look overblown within a linear color space, mid-tones are preserved, and color resolution appears more true to life.
Let's Add More
BFS 2500 also includes two different types of parallax mapping. Parallax is an ever-evolving term with numerous amounts of techniques floating around. I included basic offset mapping, seen in Unreal Engine 3, and also parallax occlusion mapping [1] which is used in CryEngine 3. Their parallax is superior to Unreal’s but it comes at a higher cost. This parallax technique uses iterative quality sampling which increases the offset quality at steeper angles. Offset mapping is faster but it can look the most distorted. The second sphere from the left uses a cube map to reflect an environment. A cube map, which is an environment unwrapped into six images, can be used for reflection, refraction, or even ambient lighting. The sphere furthest away is using only a pre-blurred cube map for ambient lighting. It’s the same cube map used on the second sphere. You can see that the top of the sphere is blue and as you go lower it turns brown. The method I used for blurring is called diffuse convolution. It’s an algorithm that scatters light from the cube map and averages them. This gives finer color results than normal blurring. The third sphere uses ideas from Team Fortress 2’s lighting scheme. They use a technique called diffuse warping [2], usually used with cel shading. However, Team Fortress' cel-shading doesn’t have hard edges because the texture they used was designed to keep a smooth edge. In the third sphere, the texture is comprised of five shades of color with no transitions.
An Interface For All
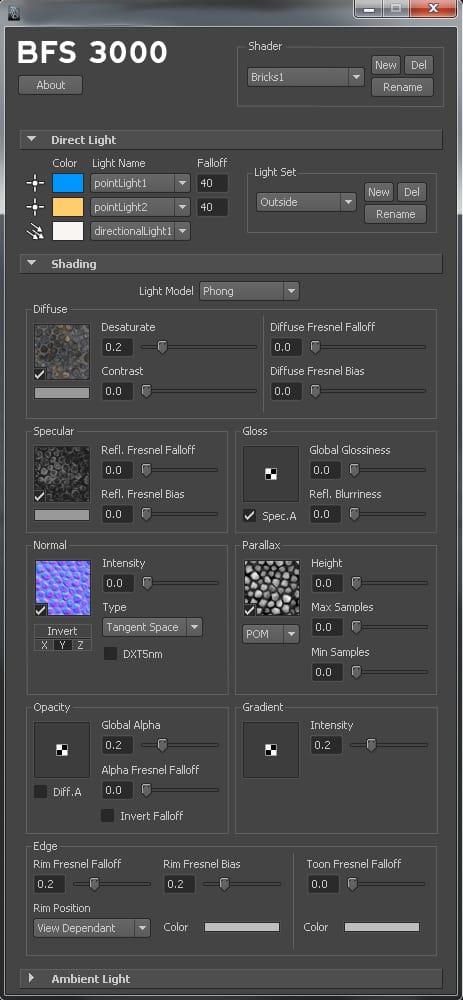
This mockup GUI to control BFS 2500 focuses on being informative, useful, and unobtrusive. I started with Autodesk Maya’s dark theme UI and kept its appeal because users are already used to it. The texture wells were created to make the UI feel more interactive. It partitions the shader’s features and lets users remember what part of the interface they need to use based on the texture well locations.